In this article, we will be discussing, How to install WordPress with LEMP stack on CentOS 7 VPS (Part2)
5. Install Nginx
Nginx pronounced as “Engine X” and is a very fast and lightweight web server, that can be used to support static files, used as a reverse proxy, and also for load balancing.
Firstly, update all the software packages by typing the following command:
# yum -y update
After that install EPEL repository that is required for Nginx packages by using the command:
# yum -y install epel-release
Now install Nginx by typing the command:
# yum -y install nginx
After the installation is completed you must Enable and Start Nginx server by typing the command:
# systemctl start nginx
And enable it with the command:
# systemctl enable nginx
Also check its status with
# systemctl status nginx
6. Configure Firewall
After completed with installation part, configure the firewall settings with the following command:
Open HTTP port by typing command with:
# firewall-cmd –permanent –zone=public –add-service=http
If firewalld package is not available then you can install it with the command:
# yum -y install firewalld
And start firewalld service with command:
# systemctl start firewalld
Now reload firewall configuration file by typing:
# firewall-cmd –reload
Now verify your installation of Nginx by visiting the following URL on any browser you like with http://ip_address
7. Configure Nginx File
An Nginx server configuration file plays an important role, So you should be more careful when setting up this file.
For configuring Nginx file go inside the following path with the following command:# cd /etc/nginx/conf.d
# vi default.conf
And write the following code in the above file i.e. default.conf.
Also change your domain in place of ip_address
server {
listen 80;
server_name 54.161.140.2;
root /usr/share/nginx/html/wordpress;
index index.php index.html index.htm;
location / {
try_files $uri $uri/ =404;
}
error_page 404 /404.html;
location = /40x.html {
root /usr/share/nginx/html/wordpress;
}
error_page 500 502 503 504 /50x.html;
location = /50x.html {
root /usr/share/nginx/html/wordpress;
}
location ~* \.php$ {
try_files $uri =404;
fastcgi_pass unix:/var/run/php-fpm/php-fpm.sock;
fastcgi_index index.php;
include fastcgi_params;
fastcgi_param SCRIPT_FILENAME $document_root$fastcgi_script_name;
}
}
And save it with :wq command, after that edit the configuration file of php-fpm with the following command:
# vi /etc/php-fpm.d/www.conf
Open the file with above command and edit the following lines i.e.
user = nginx
group = nginx
Add new listen under listen = 127.0.0.1:9000
listen = /var/run/php-fpm/php-fpm.sock
And also add
listen.owner = nginx
listen.group = nginx
Remove comment (;) from the above two lines and save it with :wq.
8. Install WordPress File
You can easily download the WordPress archive file from the link I provided in this blog.
First go inside /tmp directory by typing the below command:
# cd /tmp
Download the latest WordPress setup by using wget command
# wget https://wordpress.org/latest.tar.gz
And if wget command not work then you can download it with the following command
# yum -y install wget
Now extract the downloaded file using below command:
# tar xzvf latest.tar.gz
After that move wordpress directory in /var/www/html directory by using command:
# mv wordpress /usr/share/nginx/html
Also change the ownership of /var/www/html directory by using the following command
# sudo chown -R nginx: /usr/share/nginx/html
# chmod -R 755 /usr/share/nginx/html
9. Test WordPress
Now for testing the server of WordPress you should restart the server for that follow the command:
# nginx -t (If the command shows ‘successfully’ message then the changes in file are correct and else the changes are wrong in the nginx configuration file.)
# systemctl restart php-fpm
# systemctl restart nginx
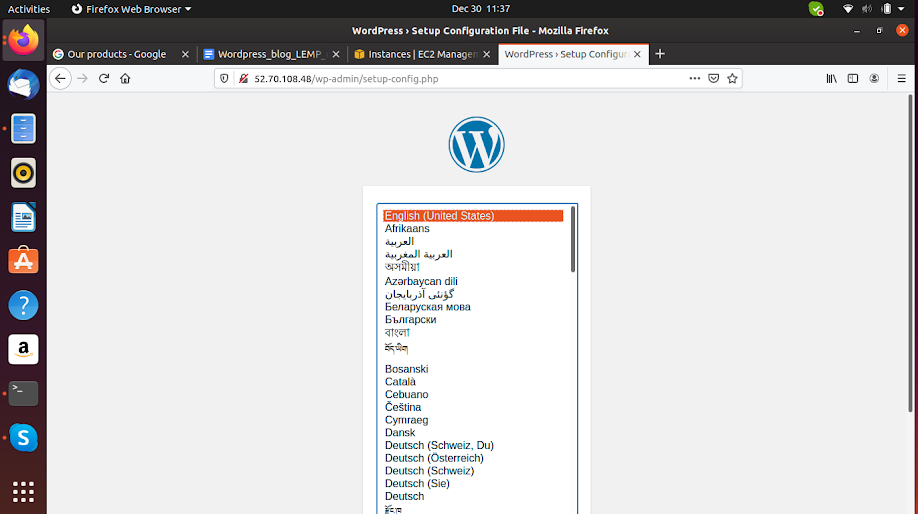
Then open any browser and type inside URL i.e http://ip_address/
After the configuration page i.e. http://ip_address/wp-admin/ is open and select language.

CONCLUSION
After this installation, you will be able to create or manage a blog in WordPress CMS in Centos VPS.
 Register
