 Register


What is Virtual Hosts/hosting?
Virtual hosting is a method for hosting multiple domain names (with separate handling of each name) on a single server (or pool of servers). This allows one server to share its resources, such as memory and processor cycles, without requiring all services provided to use the same hostname.
Prerequisite is:
You need to access the CentOS 7 server with either root or user access.
You also need to install the apache web server, if you don’t have installed you can use the following commands :
Commands used whenwe have root access otherwiseinsert sudo behind each and every command |
- yum -y update
- yum -y install httpd
- systemctl start httpd
- systemctl enable httpd
- systemctl restart httpd
- systemctl status httpd
After installation, you will see the active status when we set off the status command.
After the proper installation of Apache all you have to follow the proper steps for shared hosting:
Step 1
Buy multiple domain names from the domain provider and configure it with the DNS
Here we have purchased the two domains
For the learning purpose, we have bought from the free domain provider i.e freenom.com.
you can either buy the domain from the domain provider.

Step 2
As this is for the testing purpose so there will be no added text, pictures in these domains.
By default, there will be an index.html file in /var/www/html/index.html
The document root the top-level directory that will save the content of the website.
Here we will create the directory of each virtual host that we plan on making.

Step 3
Here we will delete the default index.html file and after the deletion, we will create the index.html file in the same /html directory.
(for deleting the use $rm -rf index.html command) (to creating use touch command touch index.html)
We have created two dir. name japan123 & japan321 and also created two files index.html
Step 4
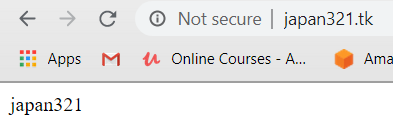
In the index.html file for both the domains( japan123.tk & japan321.tk) just write the following lines “jack ryan from florida” & “japan321”.
using the editor command $vim var/www/html/japan123/index.html & $vim var/www/html/japan321/index.html
Step 5
After doing this we will enter into the Apache configuration file to create the virtual hosts
For doing this process
![]()
Open your editor of choice and create the following basic Virtual Host configuration file:
<VirtualHost *:80> || <VirtualHost *:80>
DocumentRoot “/var/www/html/japan123” || DocumentRoot “/var/www/html/japan321”
ServerName www.japan123.tk || ServerName www.japan321.tk
ServerAlias jpan123.tk || ServerAlias jpan321.tk
<Directory /var/www/html/japan123> || <Directory /var/www/html/japan321>
Require all granted || Require all granted
</Directory> || </Directory>
</VirtualHost> || </VirtualHost>
Here we have made two virtual hosts to connect with the single server
So we have to insert the following commands shown in the above picture.
Step 6
After saving with the file we have to restart the httpd server
# systemctl restart httpd
Step 7
At last, we just put both the domain names japan123.tk & japan321.tk in the web browser.

Conclusion: After this you will able to host multiple domain on a single server.