Welcome to Part 2 of our guide on installing WordPress with the LEMP stack. In Part 1, we installed and configured MySQL 8.0 and PHP 7.2. Now, we will install Nginx, create a server block, download WordPress, and complete the installation via the web browser.
Prerequisites
-
A CentOS 7 VPS
-
Completion of Part 1 (MySQL and PHP 7.2 are installed and configured).
-
A domain name pointed to your server’s IP address (replace
your_domain.comin all commands).
Step 1: Install Nginx
Nginx (pronounced “Engine-X”) is a high-performance web server that will serve your WordPress files.
1.1 Install Nginx:
Nginx is available in the EPEL repository. Install it with:
sudo yum -y install nginx
1.2 Start and Enable Nginx:
sudo systemctl start nginx
sudo systemctl enable nginx
1.3 Verify Installation:
Check if Nginx is running without errors:
sudo systemctl status nginx
Step 2: Configure the Firewall
Allow HTTP and HTTPS traffic through the firewall so users can access your site.
sudo firewall-cmd --permanent --add-service=http --add-service=https
sudo firewall-cmd --reload
You can now verify the Nginx welcome page by visiting your server’s IP address in a browser: http://your_server_ip.
Step 3: Configure Nginx to Serve WordPress
This is the most critical step. We will create a server block (virtual host) to tell Nginx how to handle requests for your domain and process PHP files.
3.1 Create the Configuration File:
Create a new configuration file for your domain. It’s best practice to name it after your domain.
sudo vi /etc/nginx/conf.d/your_domain.com.conf
3.2 Add the Server Block Configuration:
Paste the following configuration into the file. Replace your_domain.com with your actual domain and ensure the root path is correct.
server { listen 80; server_name your_domain.com www.your_domain.com; root /usr/share/nginx/html/wordpress; index index.php index.html index.htm; access_log /var/log/nginx/wordpress_access.log; error_log /var/log/nginx/wordpress_error.log; location / { try_files $uri $uri/ /index.php?$args; } location ~ \.php$ { try_files $uri =404; fastcgi_pass unix:/var/run/php-fpm/php-fpm.sock; fastcgi_index index.php; fastcgi_param SCRIPT_FILENAME $document_root$fastcgi_script_name; include fastcgi_params; } location ~ /\.ht { deny all; } location ~* \.(js|css|png|jpg|jpeg|gif|ico|svg)$ { expires max; log_not_found off; } }
Save and exit the file (:wq).
3.3 Configure PHP-FPM:
We need to ensure PHP-FPM runs as the nginx user for proper file permissions.
sudo vi /etc/php-fpm.d/www.conf
Find and modify the following lines:
user = nginx
group = nginx
listen.owner = nginx
listen.group = nginx
listen = /var/run/php-fpm/php-fpm.sock
Save, exit, and restart PHP-FPM:
sudo systemctl restart php-fpm
3.4 Test the Nginx Configuration:
Before restarting Nginx, always test for syntax errors.
sudo nginx -t
If the test is successful, restart Nginx:
sudo systemctl restart nginx
Pro Tip: The command
nginx -tis your best friend. Never restart Nginx after a configuration change without running it first. A single typo can take your entire web server offline.
Step 4: Download and Install WordPress
4.1 Download the Latest WordPress:
Navigate to the web root and download the latest version from WordPress.org.
cd /tmp
curl -O https://wordpress.org/latest.tar.gz
4.2 Extract WordPress:
tar xzvf latest.tar.gz
4.3 Move Files to Web Root:
sudo mv /tmp/wordpress /usr/share/nginx/html/
4.4 Set Correct Ownership and Permissions:
This is crucial for security and functionality. Nginx needs to be able to read and write to these files.
sudo chown -R nginx:nginx /usr/share/nginx/html/wordpress
sudo find /usr/share/nginx/html/wordpress -type d -exec chmod 750 {} \;
sudo find /usr/share/nginx/html/wordpress -type f -exec chmod 640 {} \;
Pro Tip: Avoid using permission
777. Usingchown -R nginx:nginxgives the web server the necessary ownership, while750and640provide secure read/write/execute permissions. This is a much more secure approach.
Step 5: Complete the Installation via Web Browser
Now for the famous 5-minute WordPress install!
-
Open your browser and go to
http://your_domain.comorhttp://your_server_ip. -
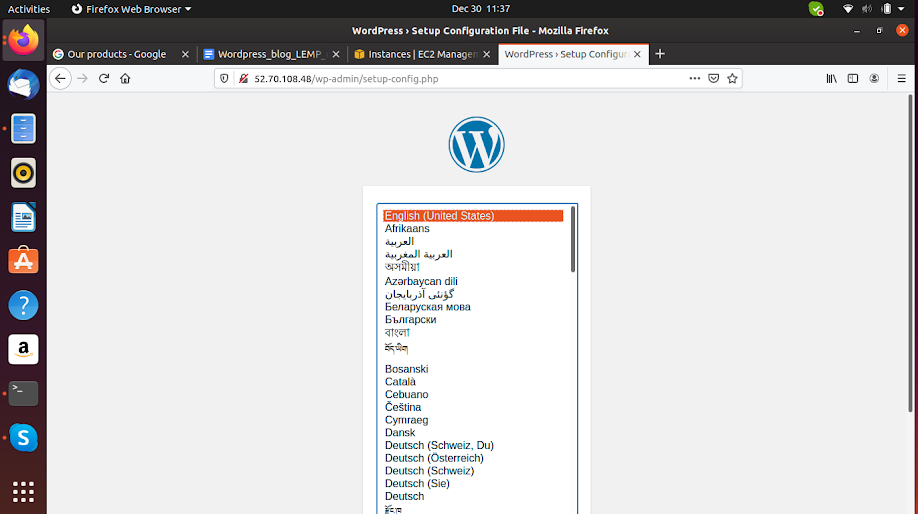
You will see the WordPress language selection screen. Select your language and click Continue.
-
You will see a welcome message. Click Let’s go!.
-
Database Configuration:
-
Database Name:
wordpress_db(the database you created in Part 1) -
Username:
wordpress_user(the user you created in Part 1) -
Password: The password for that user
-
Database Host:
localhost -
Table Prefix:
wp_(you can change this for security)
-
-
Click Submit and then Run the installation.
-
Finalize Installation:
-
Enter your Site Title, Username, Password, and Email for the WordPress admin account.
-
-
Click Install WordPress. You will then be able to log in at
http://your_domain.com/wp-admin.
Conclusion
Congratulations! You have successfully installed WordPress on a CentOS 7 VPS using the high-performance LEMP stack. You now have a secure, modern foundation for building your website, blog, or portfolio.
What to do next?
-
Log into your admin dashboard and start customizing your site with themes and plugins.
-
Crucially, install an SSL certificate (e.g., using Certbot) to enable HTTPS and make your site secure.
-
Consider implementing a caching solution (like Nginx FastCGI cache) for even better performance.
Want to Skip the Complex Setup Next Time?
Manually configuring servers is time-consuming and requires ongoing maintenance for security and performance.
Our Managed WordPress Hosting plans include:
-
1-Click WordPress Installation on an optimized LEMP stack.
-
Free SSL Certificates & CDN for speed and security.
-
Automatic Daily Backups and expert security hardening.
-
24/7 Server Monitoring and WordPress-specific support.

He is the CEO and Founder with over a decade of experience in cloud infrastructure, DevOps, and server optimization. With a strong vision and hands-on leadership approach, he has built scalable, secure, and high-performance cloud solutions trusted by businesses across industries.